Shape Shifters
TUTOR: SHARON NICHOLLS THOMSON
Work with solid fabrics and improv shapes towards your own unique and graphic design. Exercises that play with paper and fabric will help you to change and distort various geometric shapes. These resulting shapes will form the basis of your own unique improvised large or small Shape Shifter quilt project. Work on a project very similar to Hexagon Riffing or branch out to decide on your own colours and shapes.
The class will cover:
- The technique of free-cutting and decide if it’s for you.
- Some new ways to use paper and tape as templates for cutting shapes. How to begin a quilt design without a pattern.
- Ways to assess if your design is working.
- Ways to join your improv sections without a pattern.
- Prevention and troubleshooting of construction problems commonly encountered in improv quilting.
- Working exclusively in solid fabrics which may be novel for some.
Hexagon Riffing
On the first day: We will begin with exercises on paper to free up and decide on how our shapes will look. We will begin working with a basic geometric shape using the Hexagon Riffing Quilt as a guide. We will identify the areas of the shape that interest us and create blocks of varying improvised combinations and scales to make our own unique composition.
On the second day: We will be free to build our project towards completion or progress it enough to complete at home. The scale of the project is flexible; it can grow to be the desired size or be built as a ‘mini’ or cushion sized quilt. Note: Bigger is easier to piece.
Skill level: Suits all including confident beginner
Scroll down for Class Requirements
CLASS REQUIREMENTS
Shape Shifters with Sharon Nicholls Thomson
Two-day Class: Thursday, Friday, April 09, 10
Class times: 10am to 5pm
Materials fee: None
You will need to bring:
General Supplies:
- Good quality 50wt sewing thread in a neutral, eg mid grey, to use on your chosen fabrics. Sharon uses Aurifil Mako 50, Gutermann or Mettler.
- A temporary fabric marker or chalk marker that will show up on your fabric. Eg Clover Water Soluble Pencil, Sewline Trio or Chaco Liner
- Rotary cutter with fresh blade
- Acrylic fabric cutting ruler at least one. (Options: A 24 inch x 6 inch ruler will cut across the width of fabric and a 12 inch x 6 inch will be useful for smaller cuts.
- Anyone who chooses to work with triangles might like a 60-degree triangle ruler or a 45-degree triangle ruler.)
- 24 inch x 18 inch cutting mat, smaller will be trickier to work with.
- Good quality glass headed patchwork pins
- Sewing scissors or snips
- Paper scissors, glue stick for paper
- Lead pencil. Optional: 30cm ruler and eraser
- A4 or larger sketchbook, project book or paper sheets to paste designs into/onto.
REQUIREMENTS – Fabrics
Sharon advises: At least four half metre cuts of different solid fabrics, i.e. fabrics without a print.
Choose four fabrics that go together in a colour scheme that appeals to you. Make sure two of these fabrics are light or medium and two of them are dark or medium.
What we need to get started in class, is pairs of fabrics that give us some contrast in value. To make a whole quilt or to deepen the project over the two days you may want more choice beyond the four fabrics listed above so read on.
If you wish to make a project very similar to Hexagon Riffing you can use the quilt as a guide for the colours to bring.
NOTES ON FABRIC CHOICE:
It is such a tricky thing to set requirements for an improv class because who knows what you will need?? However, what I have said above will get you moving and we can work with that in class if that’s all you bring. However, I have added more notes below on quantities, prints vs solids and ways to choose a colour palette.
Quantity:
If you’re thinking of making a throw size quilt you may need a fat quarter or 30-50cm of 8-10 fabrics. Bring 50cm of your favourites and smaller amounts of the ones less appealing. If you’re making a lap quilt or smaller wall piece, you could choose to bring smaller cuts of 6-8 or 10 colours. Or larger cuts of fewer colours. There is no right or wrong. We will all learn
from each other’s choices and will be able to make an interesting piece regardless of what we bring.
Print vs solid fabrics.
In this class, we are focusing on the design element of shape. Print fabrics (unless they have a very tiny, not directional print) will distract us from the effects we are creating with the shapes. However, I don’t believe in buying loads of fabrics for a workshop if you’re not sure you’ll like the process. So, if you’re bringing from your stash and you don’t have access to solid fabrics, bring what you have with the very smallest, least noticeable solid-like print you can find. We will all learn from everyone else’s choices and the effects they create.
ADVICE ON COLOUR
Choosing a colour palette:
There are many ways to build a colour palette which would be a whole class worth of learning and in fact is one of my classes at this AQC!! Here are a few quick suggestions to get you started.
Monochrome: Choose a colour you love and begin there. Gather a few shades of that colour. Some very light, and some very dark and a few hovering in the middle. Choose one or two that are close but not exactly the same, eg If you’re working in blues, throw in one or two that lean to purple or aqua for interest. Think of adding some grey or taupe that work with your scheme. In our blue example many greys have a bluish cast and may work in that monochrome scheme. Some taupes might work with warmer colour schemes.
Using a Design Source: Pick a print fabric or photographic image that you love, choose your colour scheme based on that. Have a think about the proportions of each colour in the scheme and replicate that in your work. Sometimes print fabrics will have dots of each colour used along the selvedge that you can use for a reference.
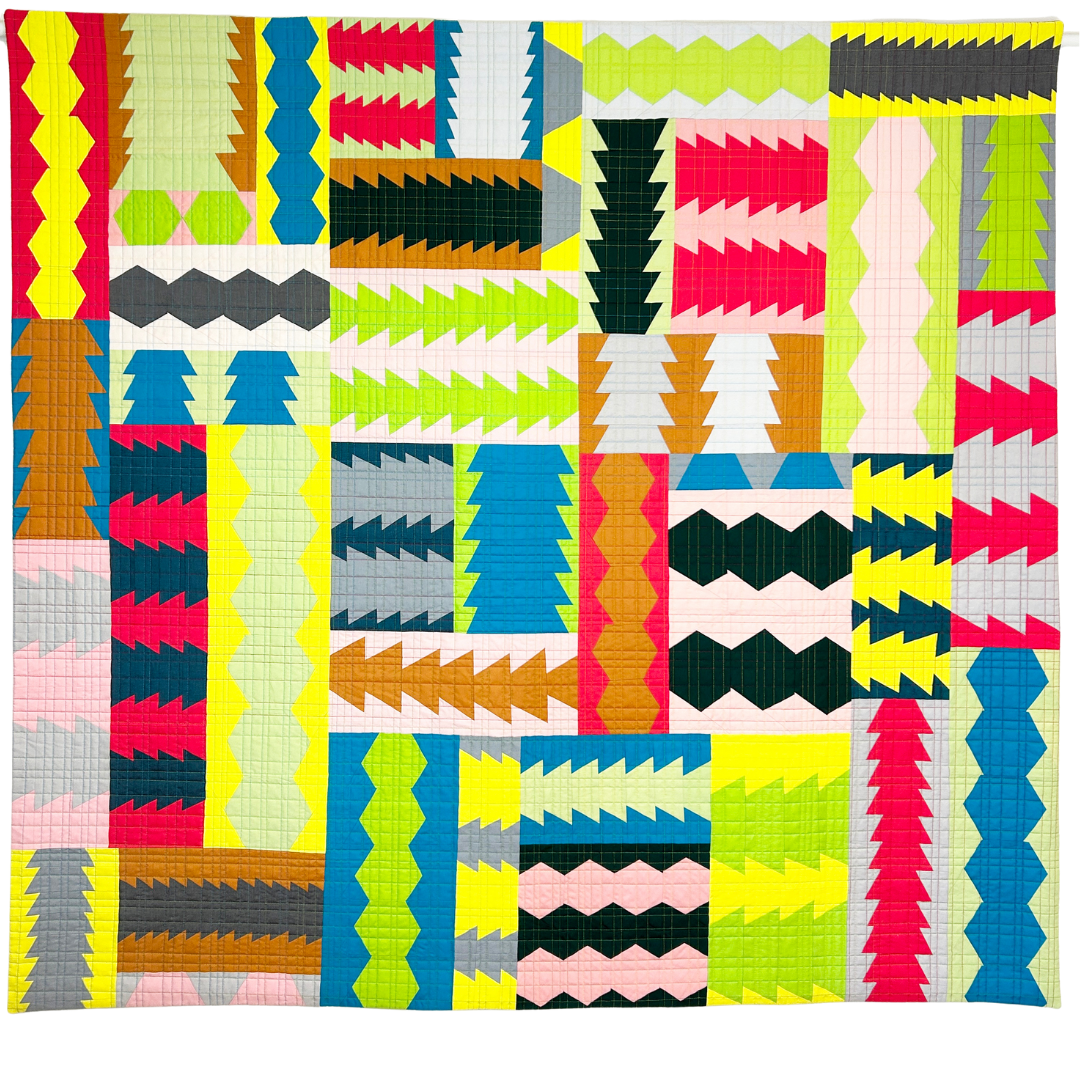
A Suggested Structure: In my quilt above, Hexagon Riffing, I used a structure that you could try. Loosely based on the colour spectrum and including some neutrals. Here’s a description of how I went about it. You could try this too:
Write the rainbow spectrum out as a list: Red, Orange Yellow, Green, Blue, Indigo, Violet, Pink. Add to that list Black, White, Grey and Brown. So, you are looking for approximately 8 colours and 4 neutrals. That’s a palette of maybe 12. Start with one of these colours, pick your very favourite and follow your nose around the colour wheel. Picking one colour to represent each colour. Don’t use the obvious highly saturated rainbow colours of it will just look like a rainbow. Think a mix of light, dark and even slightly muddy. If you don’t like something leave it out. If you’ve left something out from the colour wheel add something else in to replace it.
My Process for Hexagon Riffing:
I began with red (but you could begin anywhere) I knew I didn’t want a scarlet KFC type red so I chose a rosy watermelon from my stash to represent Red.
From there I followed my nose, based on what I like. I’m not a fan of Orange so I skipped Orange. I chose a neon Yellow that looked super punchy with the watermelon, then a spring Green. All good.
As I chose each colour from my stash I just had to decide if I liked it and if they worked together. If I didn’t think they worked or they clashed a bit, I changed colour. So far so good and I kept going, I chose a Cyan Blue.
Decided I didn’t want any Indigo or Violet because none looked any good with my already chosen colours and lastly, chose a light rosy Pink. That seemed OK as a starting point.
Now for the neutrals. Decided that I didn’t want white or black. They were going to be too harsh in this scheme, instead I chose a super pale pink to represent White, and a super dark green to represent Black. I hate Brown usually but when cruising by my browns, the tan jumped out at me and I thought: ‘Well, it’s not my favourite but I think it will work’. Also it was a
warm tan which did double duty, kind of representing Orange. Then I chose two Greys a light silvery grey and a darker gunmetal to give a rest from all the colour and two different values to give contrast.
Then I did a review. It was looking good, but I thought it needed one more lighter colour so it didn’t get too heavy and after some auditioning, I chose a pale-ish celery green. Viola! The scheme was born. I was lucky that I had a lot of solids that I had been collecting from various shops to draw from but you could do this same process at a shop. Start with one of two fabrics from your stash and take them shopping. Visit one or two shops that sell solids and build as you go. (Remember shops buy things they like, maybe visiting two shops means different choices)
Work your way around the spectrum following your nose. Remembering you need a range of different colours, a few different values and a few neutrals. I definitely wouldn’t suggest bringing any colours you really hate to class (unless in very small amounts), because even though some colours that we don’t like, actually work well in our colour scheme, if you hate them all you’ll hate working on your design and that’s no fun.
Sewing machines will be provided.
To complete the project at home: Students will need backing and wadding to progress the project to a finished quilt at home.
Students may make a cushion or bag from their piece. Again these supplies will not be required until later at home.